Summer is nearing! Go check out this fabulous giveaway over at Somewhat Simple to see how you can enter to win a super cute swimsuit of your choice from essential swimwear on her blog! Or don't... because then my chances will be that much better!
But these suits are just too cute NOT to share!
Hurry! Giveaway ends this weekend!
Thursday, April 29, 2010
Monday, April 26, 2010
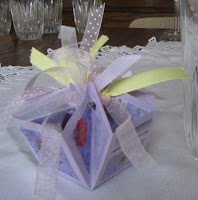
Super Easy May Day Baskets
My mom shared this may basket idea with me after she made these with her 'club' ladies the other night. I thought I'd share it since May Day is soon approaching!
First, take a 6 inch square piece of cardstock. (You can also use larger pieces if you choose, as long as they are squares, 6x6, 9x9, 12x12 inches)
I used raffia on mine... didn't add any "froof" yet... or goodies either for that matter! But I will!
Fill your basket with your May Day goodies and then set them on your friends doorstep, ring the doorbell and RUN!!!!! (At least that's how we did it when we were kids!)
Linked to:
Making The World Cuter
RootsAndWingsCo
First, take a 6 inch square piece of cardstock. (You can also use larger pieces if you choose, as long as they are squares, 6x6, 9x9, 12x12 inches)
Score each corner square in half to make 2 triangles in each corner square.
Fold the corner triangles together to punch through both layers. Then open them back up.Repeat on all 4 corners.
*The middle square will be the bottom of your basket. Flip the paper over, and you can add designs or stickers to the outside squares however you wish, just remember that the triangles will be folded inward.
Fold the triangled corners inward, joining the punched holes together. Thread ribbon or string around through all the holes and tie ends of ribbon/string together. Add more ribbon if you wish.
Fill your basket with your May Day goodies and then set them on your friends doorstep, ring the doorbell and RUN!!!!! (At least that's how we did it when we were kids!)
Linked to:
Making The World Cuter
RootsAndWingsCo
Sunday, April 25, 2010
DIY Floating Shelves
While getting a couple items at Target, I browsed through the home decor isles and had an epiphany! FLOATING SHELVES! PERFECT! Just what I can put in that empty space between my canvas' and the window in the living room!
So, even though they were on sale for $8 each, I knew I could have my hubby make them for me with some scrap wood he had. So, I went home, showed him the shelves online, and we made our own version:
First we decided to make 3 shelves: 1- 24 inches, 1-18 inches and 1-12 inches.
Hubby nailed the 3 peices of wood together... we had a larger taller back so the shelf could hold more weight and have more surface area against the wall. Then I wanted a tiny little lip in the front just in case some thing bumped the wall and a frame slipped or something. Don't want little ones (or mommies) getting knocked in the head by falling decor!
Then used some keyhole hangers for hanging. Normally, these would go straight up and down, but whoops, the back of the shelf wasn't that tall. So, angling them worked, thanks to my quick and oh so intelligent thinking! (*grin)
With a couple of layers of paint, there were ready to hang! I still need to do a little adding and moving around with the content, but I was too excited to show them off before they are complete!
Saturday, April 24, 2010
White side table updo!
I got this table at one of my dad's auctions when we were home before moving to VA. It was scuffed up, and in need of a little TLC. Sadly, I have just now gotten to doing something with it. But it worked as it was until now...
I mixed a little pink, orange, red & gold to finally get this coral-samon color I was trying to get. Picked up a little porcelain white knob, and voila!
Friday, April 23, 2010
$25 Bathroom Remodel
We are renting... so it kills me to not be able to upgrade our sad sad outdated CREAM EVERYWHERE bathrooms. With my in-laws coming for a visit, I have been on a cleaning/decorating whirlwind, trying to get the house looking nice.
I decided to paint the kids' bathroom. Below is a near exact replica of what it looked like (because I didn't have time to take a before pic of the actual bathroom)... just imagine this.
CREAM FLOOR
CREAM TUB & TILE
CREAM SHOWER
CREAM WALLS
CREAM CEILING
YUCKY BLONDE CABINETS (in my opinion)
My husband took #3 with him to do some lumber hunting, so I rushed around to get the whole bathroom painted before he got back.
Well, he returned before I was done, told me I was crazy, and then saved the day by taking off the back of the toilet for me so I could paint behind it! (I didn't think of that...oops)
My husband made the bench from scratch for the kids. There is a matching one in the main bathroom as well! He's so handy!
I decided to paint the kids' bathroom. Below is a near exact replica of what it looked like (because I didn't have time to take a before pic of the actual bathroom)... just imagine this.
CREAM FLOOR
CREAM TUB & TILE
CREAM SHOWER
CREAM WALLS
CREAM CEILING
YUCKY BLONDE CABINETS (in my opinion)
(This is our main bathroom which I hope to paint soon as well)
I found a cute shower curtain at Target on clearance for under $7, and 2 matching rugs, both under $7 each. Then the other day I got a cheap can of paint at wal-mart.My husband took #3 with him to do some lumber hunting, so I rushed around to get the whole bathroom painted before he got back.
Well, he returned before I was done, told me I was crazy, and then saved the day by taking off the back of the toilet for me so I could paint behind it! (I didn't think of that...oops)
Here is my remodel all complete:
My husband made the bench from scratch for the kids. There is a matching one in the main bathroom as well! He's so handy!
Friday, April 16, 2010
Thursday, April 15, 2010
Join the Club!
I've been wanting to start a 'Cupcake Wrapper Of The Month Club' for quite some time. Now that spring is here, I've decided to get it going! I've just listed 2 options in my etsy shop!
6 month or 12 month subscriptions.
Tell Your Friends!!!
Details Below:
*Each month you will receive a different set of 12 cupcake wrappers appropriate for the time of year or upcoming holiday! These sets may or may not be available in my shop, so you could be receiving exclusive items only available to club members!
*Save big! Free shipping! Your membership also includes special offers and surprises throughout your membership!
*Receive 10% discount for the entire duration of your membership on orders from my shop! Including custom orders!
*All wrappers will be mailed out between the 1st and 7th of the month. Your first month’s wrappers will be mailed out the month after you sign up. But no worries, you won’t have to wait, I’ll send you a surprise gift right away just for joining the club!
*Want to purchase these as a gift? Or want to send one month to a friend as a gift? No problem! Just send me the recipient’s info in the buyer’s message upon purchase, or in a convo!
*All items made from a smoke free and pet free home!
Tuesday, April 13, 2010
Drink Coffee?
Get a free cup of coffee April 15th at Starbuck's!
Just bring in a reusable travel mug to any participating Starbucks for your FREE brewed coffee! More details HERE.
Sunday, April 11, 2010
Tipsy Flower Pot
I first saw these a couple years ago and always wanted to make one. So, this morning 2 of my 4 kiddos helped me fill the pots with dirt and plant some petunias in my 'tipsy flower pot'. Super fun amd super easy.
For instructions on how to make your own go here.
Saturday, April 10, 2010
Meet Victoria
Guess what?!?! I won a giveaway! And... just the other day my prize arrived in the mail...Meet Victoria... my lovely scentsy warmer! Isn't she beautiful... I love it! Thinking about changing up my decor to match it!!! Maybe even throw some paint on some walls... okay maybe not that far. But I do love it! Thank you Andrea very much! I love your blog!
Go check out Andrea's Blog, where I won this beauty:
Wednesday, April 7, 2010
Free TuTu Lessons
Have you seen all the cute tutus on the internet lately! They are all the rave now! And they aren't just for dress up anymore!!!! Want to learn how to make your own? Well, Jenni, from MissTutu.com is launching a new website and is offering free video lessons via email when you go check out her new site and register for free! So I'm helping her spread the word!
If you are interested, go to MissTuTu.com and register, and don't forget to enter my name, "KIM", so she knows who sent ya!
Here are a couple tutus I've made for my little Addi. The first is her Ladybug costume.
And this one was what she wore to the 4th of July Parade last summer!
They are so much fun and super easy to make! You can make them for a fraction of the cost that people are charging online... so go get your free video lessons so you can make your own at MissTuTu.com and enter my name: KIM
"I am not being compensated for this post, however I am entering a competition to see which mom blogger can share this free tutu lesson with the most people by April 30th."
Monday, April 5, 2010
Great Balls of Fire
A while back I won a set of tea light holders from Tante Caroline's Etsy shop. You should definitely check out her items... you will be amazed at how great they look!
The set I received is like the set in the picture here... and they are so LIGHT!!!! Looks can be deceiving! At first glance, you'd think these 'great balls' are super heavy, but in fact, made of styrofoam, they are practically weightless!
I was so excited when I got these in the mail. I fell in love with them right away and (tea lights included) put them on display!
Saturday, April 3, 2010
Friday, April 2, 2010
PB remake Bulletin Board Tile Set
I was flipping through the Pottery Barn Teen magazine a few weeks ago and came across this tile set I thought would be PERFECT for my 12 year old daughter's room. She has tons of wall space above her desk. Perfect!
So, I showed the picture to my husband and we make a trip to Lowes for the supplies.
We bought a sheet of white board (and had them cut it into 2 3x3 foot (plus a couple inches for the border) pieces. (Which meant we could make one for my craft room too!)
Then we found some simple trim. Which my husband cut for me when we got home.
I had found 12x12 inch corkboard squares in a pack of 4 at Michaels and of course had scrapbook paper on hand.
Over all, we were able to make 2 of these for less then $20 each. That's much better than what you'd have to pay Pottery Barn for... are you ready for this? $339.00 **If you hurry, there is a special going on now.. ONLY $299.00. *sarcasm*
OUCH!
Here's how we made my daughters:
This was where my husband got me to. Framed white board. Ready to go.
Then I glued on corkboard and scrapbook paper in the squares I wanted.Then in the large open square, I decided to make her a big calendar she could keep track of special dates for assignments (ha, yeah right!) and birthdays...
Then I had hubby hang it above her desk! Voila! I bought her some white board markers and some fun push pins... and let her GO!I will post a pic of mine. I'm trying to find some 12x12 magnetic sheets so mine will be magnetic (unfortunately the whiteboard at lowes was NOT)
So, I showed the picture to my husband and we make a trip to Lowes for the supplies.
We bought a sheet of white board (and had them cut it into 2 3x3 foot (plus a couple inches for the border) pieces. (Which meant we could make one for my craft room too!)
Then we found some simple trim. Which my husband cut for me when we got home.
I had found 12x12 inch corkboard squares in a pack of 4 at Michaels and of course had scrapbook paper on hand.
Over all, we were able to make 2 of these for less then $20 each. That's much better than what you'd have to pay Pottery Barn for... are you ready for this? $339.00 **If you hurry, there is a special going on now.. ONLY $299.00. *sarcasm*
OUCH!
Here's how we made my daughters:
This was where my husband got me to. Framed white board. Ready to go.
Then I glued on corkboard and scrapbook paper in the squares I wanted.Then in the large open square, I decided to make her a big calendar she could keep track of special dates for assignments (ha, yeah right!) and birthdays...
Then I had hubby hang it above her desk! Voila! I bought her some white board markers and some fun push pins... and let her GO!I will post a pic of mine. I'm trying to find some 12x12 magnetic sheets so mine will be magnetic (unfortunately the whiteboard at lowes was NOT)
Subscribe to:
Posts (Atom)